Nowadays we all use cloud storage in some sort of way. Whether we use a file syncing service, e.g. Dropbox, or one of our favorite mobile apps use it in the back-end, it’s all around us.
It’s important to add that cloud storage plays a major role in the enterprise environments since it’s part of the Backup and Recovery strategy of many major companies.
Today we will dig into tools provided by the .NET framework and the Windows Azure SDK to build our own "file syncing service" comprised by a client application for the desktop and we’ll also do some listing of our cloud stored files from a web page.
The application flow.
In order to sync files into a cloud based storage container formal applications like Dropbox, Google Drive and such use a complex set of rules to decide if an action needs to be made upon the changes that occur to a file in a desired file system directory. Our service is going to be a little bit more simple, we’re are going to upload all the files that have been changed in the desired directory regardless of the CRUD (CREATE, UPDATE, DELETE) operation made to it.
Here’s a flow chart describing our application’s flow:
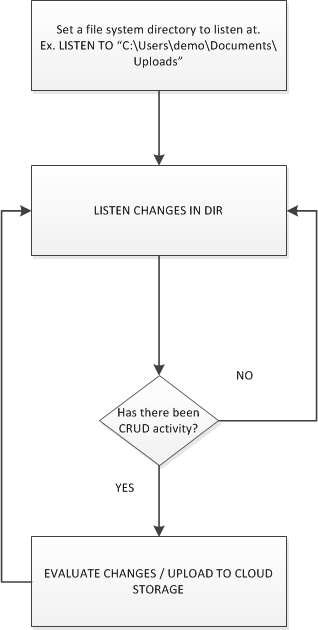
This simple scheme should suffice for our demonstration. Feel free to add more complex processes to the mix.
The FileSystemWatcher Class
Instead of having to create our own mechanism of waiting for changes to a directory we’ll use an useful class that the .NET framework provides: The FileSystemWatcher class whose solely purpose isto listen to the file system change notifications and raises events when a directory, or file in a directory, changes.
FileSystemWatcher provides a set of notification filters that allow us to identify with ease changes to file attributes, last write dates and times or simply file size. We can also use wildcards to filter the files we are watching by their types, e.g. if we set *.png as our file type filter, then we are only get notified by changes made to PNG files. It's important to note that for the time being filters only support one wildcard setting. Which implies that if we want to have a set of rules for specific file types we’re going to have to get them all and filter them manually.
For simplicity purposes we are going to use the example displayed on the MSDN page as our base program and build from there.
Here is the code:
using System;
using System.IO;
using System.Security.Permissions;

public class Watcher
{

    public static void Main()
    {
        Run();
    }

    [PermissionSet(SecurityAction.Demand, Name="FullTrust")]
    public static void Run()
    {
        string[] args = System.Environment.GetCommandLineArgs();

        // If a directory is not specified, exit program.
        //
        if(args.Length != 2)
        {
            // Display the proper way to call the program.
            Console.WriteLine("Usage: Watcher.exe (directory)");
            return;
        }

        // Create a new FileSystemWatcher and set its properties.
        //
        FileSystemWatcher watcher = new FileSystemWatcher();
        watcher.Path = args[1];
        /*
         * Watch for changes in LastAccess and LastWrite times, and
         * the renaming of files or directories.
         */
        watcher.NotifyFilter = NotifyFilters.LastAccess | NotifyFilters.LastWrite
           | NotifyFilters.FileName | NotifyFilters.DirectoryName;

        // Only watch text files.
        //
        watcher.Filter = "*.txt";

        // Add event handlers.
        //
        watcher.Changed += new FileSystemEventHandler(OnChanged);
        watcher.Created += new FileSystemEventHandler(OnChanged);
        watcher.Deleted += new FileSystemEventHandler(OnChanged);
        watcher.Renamed += new RenamedEventHandler(OnRenamed);

        // Begin watching.
        //
        watcher.EnableRaisingEvents = true;

        // Wait for the user to quit the program.
        //
        Console.WriteLine("Press \'q\' to quit the sample.");
        while(Console.Read()!='q');
    }

    // Define the event handlers.
    //
    private static void OnChanged(object source, FileSystemEventArgs e)
    {
       // Specify what is done when a file is changed, created, or deleted.
       //
       Console.WriteLine("File: " +  e.FullPath + " " + e.ChangeType);
    }

    private static void OnRenamed(object source, RenamedEventArgs e)
    {
        // Specify what is done when a file is renamed.
        //
        Console.WriteLine("File: {0} renamed to {1}", e.OldFullPath, e.FullPath);
    }
}
It’s important to understand that our application needs to use FullTrust as its permission profile. This can be achieved using the attribute called PermissionSet. Don’t worry about this all this type of applications need that kind of permission in order to access file system information of Reads/Writes to our directory (Remember the UAC popup you got when you installed Dropbox, Google Drive, etc. well this is that).
What do we have?
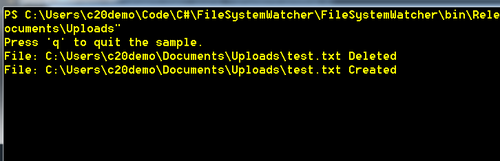
Amazingly with these few lines of code we already have a system that "listens" to a specific directory and notifies CRUD operations on text files.
If you run this code this is what you should see:
The Cloud
Now that we have our directory listening in place, let's setup our cloud storage. I'll use Windows Azure Blob Storage Service to host my files in the cloud. Keep in mind that this can be changed anytime for any other option out there, like Amazon S3.
Glossary
Cloud storage is a model of networked storage where data is stored, accessed and managed third party’s infrastructure, allowing the user to take advantage of the scale and efficiency of virtualized pools of storage.
Blob (binary large object), according to SearchSQLServer, is a collection of binary data stored as a single entity in a database management system. Blobs are typically images, audio or other multimedia objects, etc.
Container, grouping of a set of blobs.
You can read more about Windows Azure Blob Storage Service specific terminology and the code needed to store, access and manage files here.
Let's code
From this point on I’ll assume that you have a Windows Azure Storage account setup and you have installed the Windows Azure SDK. If you need help with this, follow the steps from this guide.
In order to access our storage account from code we need to define a connection string for it, the format for the app.config or web.config entry is as follows:
<add key="StorageConnectionString" value="DefaultEndpointsProtocol=https;AccountName=[AccountName];AccountKey=[AccountKey" />
Just replace the information with the strings provided in the Windows Azure portal. You can read more about how to configure the connection strings here and here.
First let’s add the references to the namespaces we will use.
using Microsoft.WindowsAzure.Storage;
using Microsoft.WindowsAzure.Storage.Blob;
With our connection string in place it’s time to connect to our cloud storage account.
// Retrieve the connection string node from the config file
//
var config = ConfigurationManager.ConnectionStrings["StorageConnectionString"];

// Let's create an instance of our storage account
//
var storageAccount = CloudStorageAccount.Parse(config.ConnectionString);
Now let's create or access our blob container.
// Create the blob client.
//
var blobClient = storageAccount.CreateCloudBlobClient();// Retrieve a reference to a container.
container = blobClient.GetContainerReference("files");// Create the container if it doesn't already exist.
container.CreateIfNotExists();// Setting the contents of the container public.
container.SetPermissions(
                        new BlobContainerPermissions
                        {
                            PublicAccess = BlobContainerPublicAccessType.Blob
                        });
As you can see I’m using lower case for the container name. There's a set of naming conventions in Windows Azure Cloud Storage when it comes to naming. For example you should avoid using special characters and upper cases when naming your containers. These constraints are in place in order to generate valid URI's to our files in the cloud. I’d recommend reading about it before attempting to start using the service. Here's more information about this.
The blob container instance will represent our interface between the blob storage in the cloud and our source of files. Through it we will be able to access and manage our files with ease.
Uploading to the cloud
Now that we have a container to put our files in, we need to write the code that uploads the files to it. In order to achieve this we need to write very little code.
// Retrieve reference to a blob named "myfile".//CloudBlockBlob blockBlob = container.GetBlockBlobReference("myfile");// Create or overwrite the "myfile" blob with contents from a local file.//using (var fileStream = File.OpenRead(localFilePath))
{
      blockBlob.UploadFromStream(fileStream);
}
This is all we need. But we need to take into account to things:
- If we choose to create blob references based on our local file name
we need to strip down the string (that represents the file name) and put everything in lower case. - The UploadFromStream method will overwrite any file in the
container using the same blob reference.
The final client code
With all the discussed updates out code is going to end up looking like this:
using System;
using System.Configuration;
using System.IO;
using System.Security.Permissions;
using System.Text;
using Microsoft.WindowsAzure.Storage;
using Microsoft.WindowsAzure.Storage.Blob;

namespace FileSystemWatcher
{
    public class Watcher
    {
        private static CloudBlobContainer _container;
        public static void Main()
        {
            // Retrieve the connection string node from the config file
            //
            var config = ConfigurationManager.ConnectionStrings["StorageConnectionString"];

            // Let's create an instance of our storage account
            //
            var storageAccount = CloudStorageAccount.Parse(config.ConnectionString);

            // Create the blob client.
            //
            var blobClient = storageAccount.CreateCloudBlobClient();

            _container = CreateContainer("mycontainer", blobClient);

            Run();

        }

        public static CloudBlobContainer CreateContainer(string containerName, CloudBlobClient blobClient)
        {
            // Retrieve a reference to a container.
            //
            _container = blobClient.GetContainerReference(containerName);

            // Create the container if it doesn't already exist.
            //
            _container.CreateIfNotExists();

            // Setting the contents of the container public.
            //
            _container.SetPermissions(
                new BlobContainerPermissions
                {
                    PublicAccess = BlobContainerPublicAccessType.Blob
                });

            return _container;
        }

        public static void UploadBlob(string filePath)
        {
            string fileName = Path.GetFileName(filePath);

            // Retrieve reference to a blob named "myblob".
            //
            CloudBlockBlob blockBlob = _container.GetBlockBlobReference(RemoveSpecialCharacters(fileName));

            // Create or overwrite the "myblob" blob with contents from a local file.
            //
            using (var fileStream = File.OpenRead(filePath))
            {
                blockBlob.UploadFromStream(fileStream);
            }
        }

        [PermissionSet(SecurityAction.Demand, Name = "FullTrust")]
        public static void Run()
        {
            string[] args = Environment.GetCommandLineArgs();

            // If a directory is not specified, exit program.
            //
            if (args.Length != 2)
            {
                // Display the proper way to call the program.
                //
                Console.WriteLine("Usage: Watcher.exe (directory)");
                return;
            }

            // Create a new FileSystemWatcher and set its properties.
            //
            var watcher = new System.IO.FileSystemWatcher
            {
                Path = args[1],
                NotifyFilter = NotifyFilters.LastAccess | NotifyFilters.LastWrite
                               | NotifyFilters.FileName | NotifyFilters.DirectoryName,
                Filter = "*.*"
            };

            /*
             * Watch for changes in LastAccess and LastWrite times, and
             * the renaming of files or directories.
             */

            // Add event handlers.
            //
            watcher.Changed += OnChanged;
            watcher.Created += OnChanged;
            watcher.Deleted += OnChanged;
            watcher.Renamed += OnRenamed;

            // Begin watching.
            //
            watcher.EnableRaisingEvents = true;

            // Wait for the user to quit the program.
            //
            Console.WriteLine("Press \'q\' to quit the sample.");
            while (Console.Read() != 'q')
            {
                // Just wait and bleed.
            }
        }

        // Define the event handlers.
        //
        private static void OnChanged(object source, FileSystemEventArgs e)
        {
            // Specify what is done when a file is changed, created, or deleted.
            //
            Console.WriteLine("File: " + e.FullPath + " " + e.ChangeType);

            Console.WriteLine("Uploading...");
            UploadBlob(e.FullPath);
            Console.WriteLine("{0} uploaded successfully to container {1}.", e.Name, _container.Name);

        }

        private static void OnRenamed(object source, RenamedEventArgs e)
        {
            // Specify what is done when a file is renamed.
            //
            Console.WriteLine("File: {0} renamed to {1}", e.OldFullPath, e.FullPath);

            Console.WriteLine("Uploading...");
            UploadBlob(e.FullPath);
            Console.WriteLine("{0} uploaded successfully to container {1}.", e.Name, _container.Name);
        }

        public static string RemoveSpecialCharacters(string str)
        {
            var sb = new StringBuilder();
            foreach (char c in str)
            {
                if ((c >= '0' && c <= '9') || (c >= 'A' && c <= 'Z') || (c >= 'a' && c <= 'z' || c == '.'))
                {
                    sb.Append(c);
                }
            }
            return sb.ToString();
        }
    }
}
It’s worth mentioning that this is a very simple implementation and does not have special rules based on file types or changes made to them. Our program is always going to upload every file regardless of what happened to the file or if there’s already a blob reference with the same name in the container. Feel free to modify this so it fits your own needs.
If everything works as expected your program should be uploading files to your container already. If you want to check if it’s working properly just go to the Windows Azure portal and look inside of your container. You should have some files listed there.

Listing our uploaded files
Now we can write our web front-end for our container. Think of it as the web interface of Dropbox or Google Drive. In order to achieve this, we just need to list the files in the container and then format the way they get displayed however we want.
In order to list the files in a container we need to write very little code.
// Loop over items within the container and output the length and URI.
//
foreach (IListBlobItem item in container.ListBlobs(null, false))
{
    var blockBlob = item as CloudBlockBlob;
    if (blockBlob != null)
    {
        var blob = blockBlob;
        files.Add(new BlobInfo
           {
               Name = blob.Name,
               Length = blob.Properties.Length,
               Uri = blob.Uri.ToString()
           });
    }
    else
    {
        var blob = item as CloudPageBlob;
        if (blob != null)
        {
            CloudPageBlob pageBlob = blob;
            files.Add(new BlobInfo
            {
                Name = blob.Name,
                Length = blob.Properties.Length,
                Uri = blob.Uri.ToString()
            });
         }
        else
        {
            var blobDirectory = item as CloudBlobDirectory;
            if (blobDirectory != null)
            {
                CloudBlobDirectory directory = blobDirectory;
                files.Add(new BlobInfo
                {
                    Name = blob.Name,
                    Length = blob.Properties.Length,
                    Uri = blob.Uri.ToString()
                });
            }
        }
    }
}
You can create a WebForms or MVC site and just display in a page or view our container contents.
In my case I chose to use an MVC site and this is how my files look when listed in my front-end.
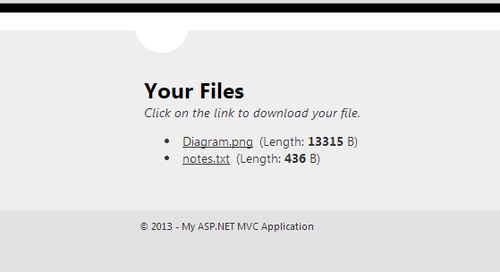
My front-end is hosted here just in case you want to download the files in my storage container.
Ideally you could modify the file listening implementation to be more "smart" and use thread safe queue's that evaluate files by priority or whatever rule that comes to your mind. It’s also a cool scenario to play with the async and await constructs that were included in the language (C#) in order to support asynchronous programming.
Conclusion
Cloud computing has recently become the "main event" in the IT landscape. There's a lot of buzz about it and how it affects our lives on a day to day basis. The "cloud" has become the back-end architecture that powers a lot of the applications we use Today whether on the desktop, the browser or our mobile devices.
The software development ecosystem has been revolutionized by the cloud computing concept, allowing applications to be available to everyone regardless of the platform. I encourage you to exploit this resources we have at hand to deliver more awesome apps that change people’s day to day lives.